App Language Change in Android: A Study in Problem Solving
Learn how to implement app-specific language changes in Android, regardless of the OS language, and explore the new LocaleManager API introduced in Android 13. Understand the challenges and solutions for dynamic language resource installation and synchronization, ensuring a seamless multilingual user experience.

Key takeaways:
Our Android Engineer, Alireza Rahmaty, shares innovative approaches and practical tips to enhance your app’s localization capabilities, unlocking new opportunities for engaging a global audience.
{{divider}}
When talking about Localization, we might only consider having string resources in different languages and regions, but we can adapt every app resource to locals. We have many resources in the app, such as drawables, sounds, fonts, animations, colors, etc. All of them can be subcategorized for different locales.
Making the app responsive to different languages and regions is called localization. This customization in resources helps to achieve more users, revenue and growth. The OS handles Switching between localized resources, but applications should have the appropriate implementation to handle configuration changes.
Changing the app’s language on Android, regardless of the OS language, has been an ongoing challenge and has raised some complex problems. However, it brings massive business value in the long term since many users are multilingual and tend to apply a specific language to each app rather than the default OS language.
Before Android 13, there was no official recommendation to change the app language. Still, we have been able to change the app's locale by creating or updating the configuration instance with the desired language and attaching it to the context.
1. Until Android 16, updateConfiguration method was used to modify the configuration, and it has been deprecated since SDK 17 (but still working 😈).

2. Using createConfigurationContext of ContextWrapper, introduced on Android SDK 17. This way, we create a localized context and pass it to activities and application classes as a new base.
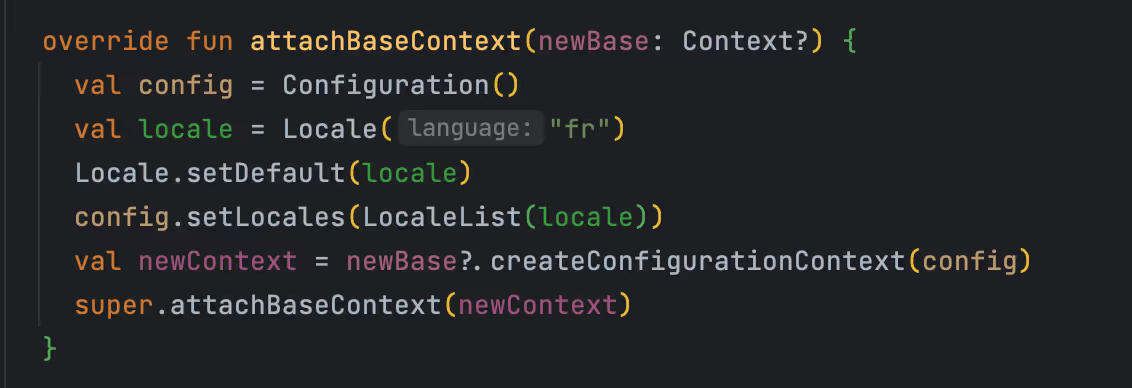
3. Using applyOverrideConfiguration: This method is also a bit tricky to ensure is called before any call to getAsset() or getResource(), making the implementation super delicate.
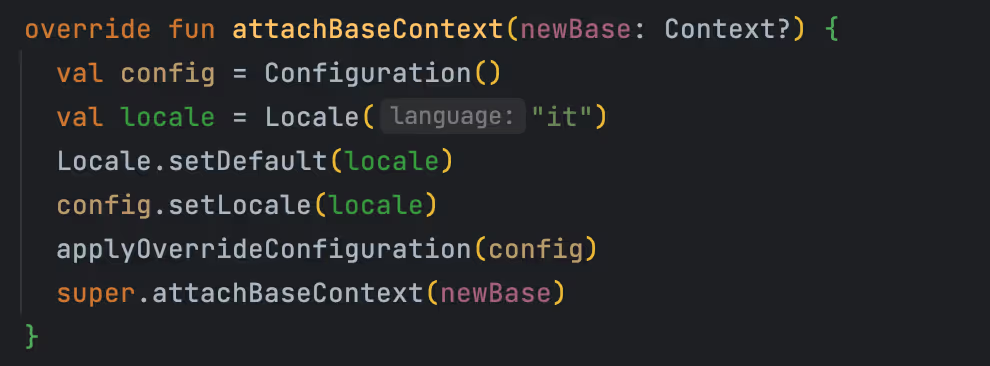
Problems using these approaches: Imagine we have created a method called changeLanguage with one of the implementations above
- We should always fight the system by changing the locale of a configuration instance during callbacks such as onConfigurationChanged and onCreate since the OS always resets the Configuration to defaults.
- If we have multiple activities or services, we should keep all of them in sync.
- Most of the time, activity toolbar titles are not in sync with the applied locale, so we should sync the activity title after its creation to display it in the desired locale.
One more thing to note is Locale.setDefault(), which we have to call with all three approaches.
Leveraging Per App Language on Android 13+ 👏
A new API is providing an innovative solution by helping us remove lots of boilerplate code. A new service called Locale service has been added recently, and LocaleManager is a bridge to access it. With this new service, regardless of OS language, all apps could have specific languages, either through the OS setting or a language picker feature. We can even have both implementations on our apps, the problem is solved! Now, we focus on forward-thinking approaches and ensuring they stay in sync.
Enabling App-specific language change option on the OS setting:
This option only exists on Android 13+. First, we need to determine the list of languages our app supports by setting up the locale configuration. This can be set up in two ways: through a config XML file or by setting it up dynamically in the code.
Locale Configuration file
We can manually create a locale config file in the XML folder and reference it in the application tag in the manifest file.


The interesting part is you don't need to create the aforementioned file and reference it in the manifest if you set autogenerate config for Gradle; Gradle will do the job for you. However, be careful, as you may not have control over the list of displayed languages, and there could be a language you don't want to appear in the settings.

Setting locales programmatically!
The other innovative solution is to set the locale config dynamically by calling the setOverrideConfig method on the app start-up time, which has been available recently on Android 14(SDK 34). We are interested in this method because we can set up the language change feature for a specific set of users under an A/B experimentation and also change the list of available languages without an app release. However, the drawback is that we can use it only on Android 14, and it's not backward compatible.

The last step is to save the selected local so that the OS will know which language to use for your app. On Android 13+, this is automatically saved, but for lower versions, you can use the locale metadata service at the app-level manifest file by using the following snippet. This will cause strict mode violations.

⛳Up until here, we have enabled OS-level language change for our app only using an XML locale file, and we can't create it dynamically unless we set the minimum SDK to 14.
As a result, the language menu should appear on Android 13+; unfortunately, this menu doesn't exist on lower versions. You can stop at this point since, with this configuration, the language change is possible through the OS setting! 🎉
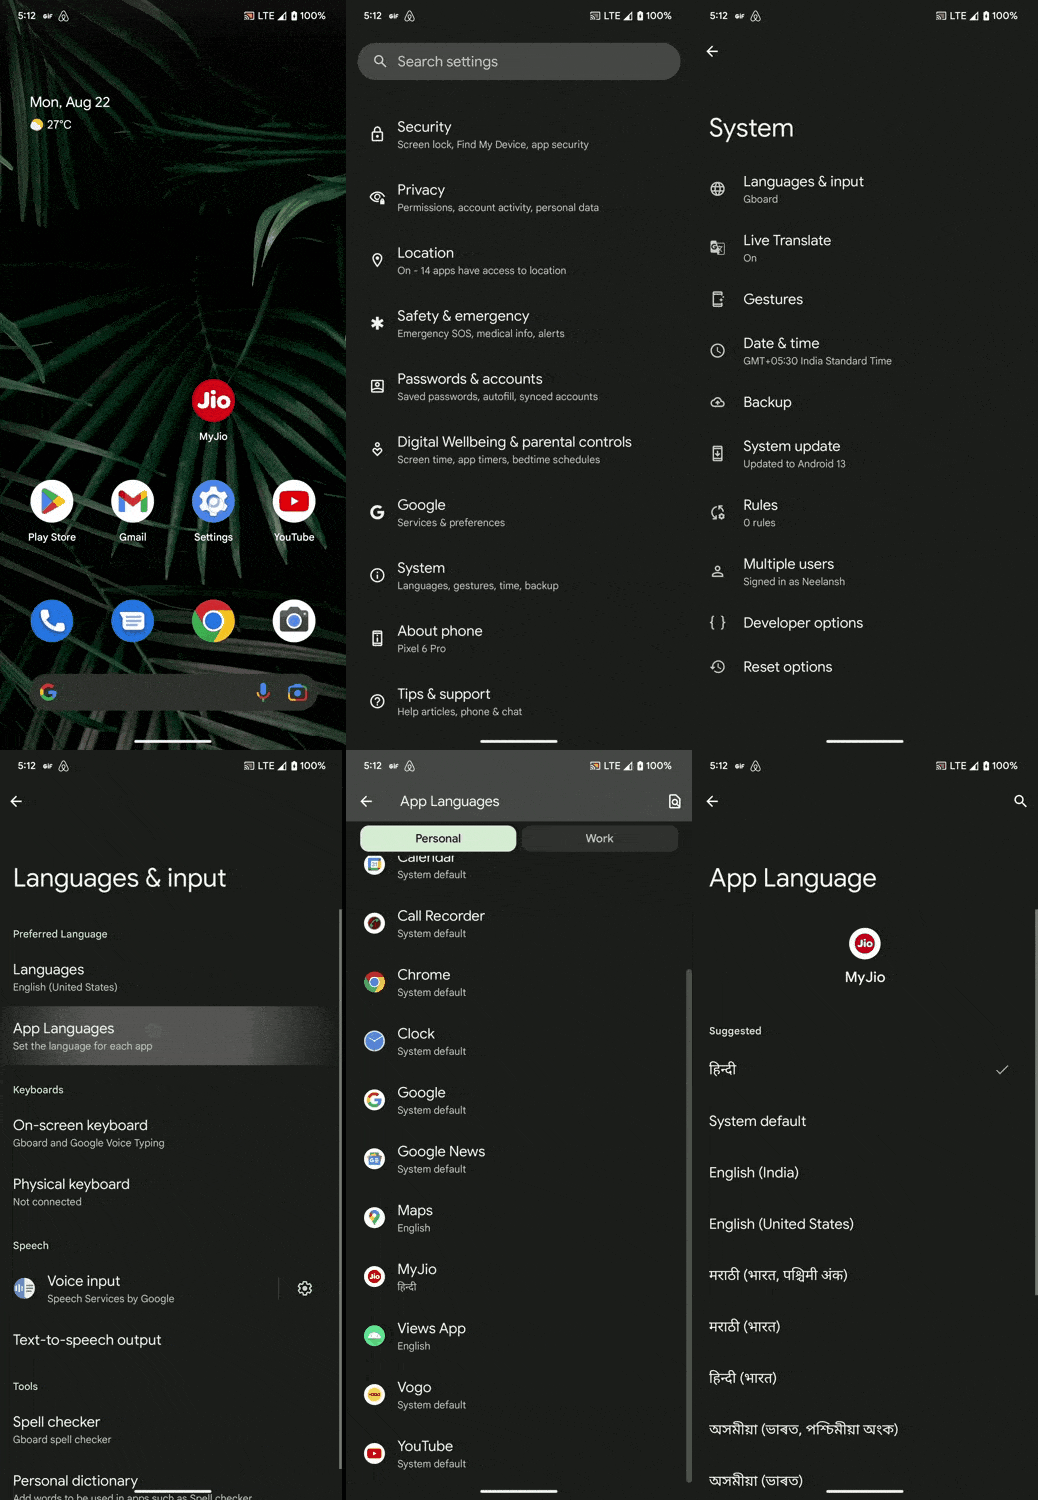
Setting up a language picker
Implementing the UI of the language picker should be straightforward. It could be a BottomSheetFragment with a list of languages, which we could either fetch from the backend or use a static list.
Another thing about UI implementation is that you can make a language name unique in all locales. 😕
If you choose to use a specific language name, like Deutsch, in all translations, you can either create a string resource with the translatable property set to false (so the IDE ignores it) or use the displayName property of the Locale class to show the language name based on the context.

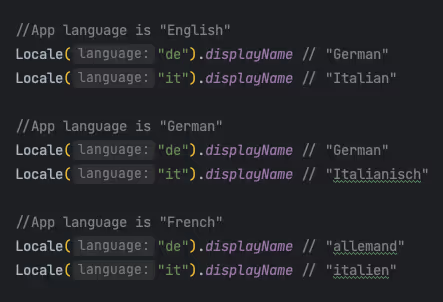
The next step is to apply the selected language to the app by calling
AppCompatDelegate.setApplicationLocales(LocaleListCompat.forLanguageTags("it")).
The method triggers a configuration change and calls onDestroy, attachBaseContext, and onCreate on the MainActivity, allowing for side effects like tracking analytics or updating HTTP request headers. Important: Don’t call this method before the MainActivity's onCreate, or the app will crash!
Pro Tip: If using a DialogFragment to show the language list, it's easier to call setApplicationLocales after the fragment closes to avoid potential configuration issues.
Until this point, everything should be working smoothly when changing the language in the Debug APK using the app’s language setting or picker. However, the complex problem arises when switching to the release app bundle.
Challenging part! Language resource Installation, Dynamic delivery
The new language content won’t be available right away after the app is released. Unlike the debug version, the language change in the release app won’t happen instantly. This is because the selected language resources might not be immediately accessible in the release version.
While releasing the app bundle, Google Play split it based on the languages, density, etc. If we have 4 densities and 10 languages, then there would be 40 different APK versions, and the final APK installation would be based on the device's language and density specs. This really helps optimize app download size, but it hinders the language change functionality!
The new language API is built so that when a new language is applied, Google Play automatically installs the language resources for the app. While this is a great feature, the process typically takes a few days to complete.
To speed up the process, we can use the SplitInstallManager API. This allows us to request the language resource download from Google Play immediately when a new language is applied, ensuring faster availability.
First, let’s enable the SplitInstall API in our application. This will allow the activity/app access to the installed resources.
If you have only one activity, override attachBaseContext

In the case of a custom application class, simply inherit SplitCompatApplication.
Then, use the SpilitManager API to make a language installation request. The SpilitManager applies a “fire-and-forget” approach, so we must observe the request status using the SplitInstallStateUpdatedListener class. Remember to unregister the listener.
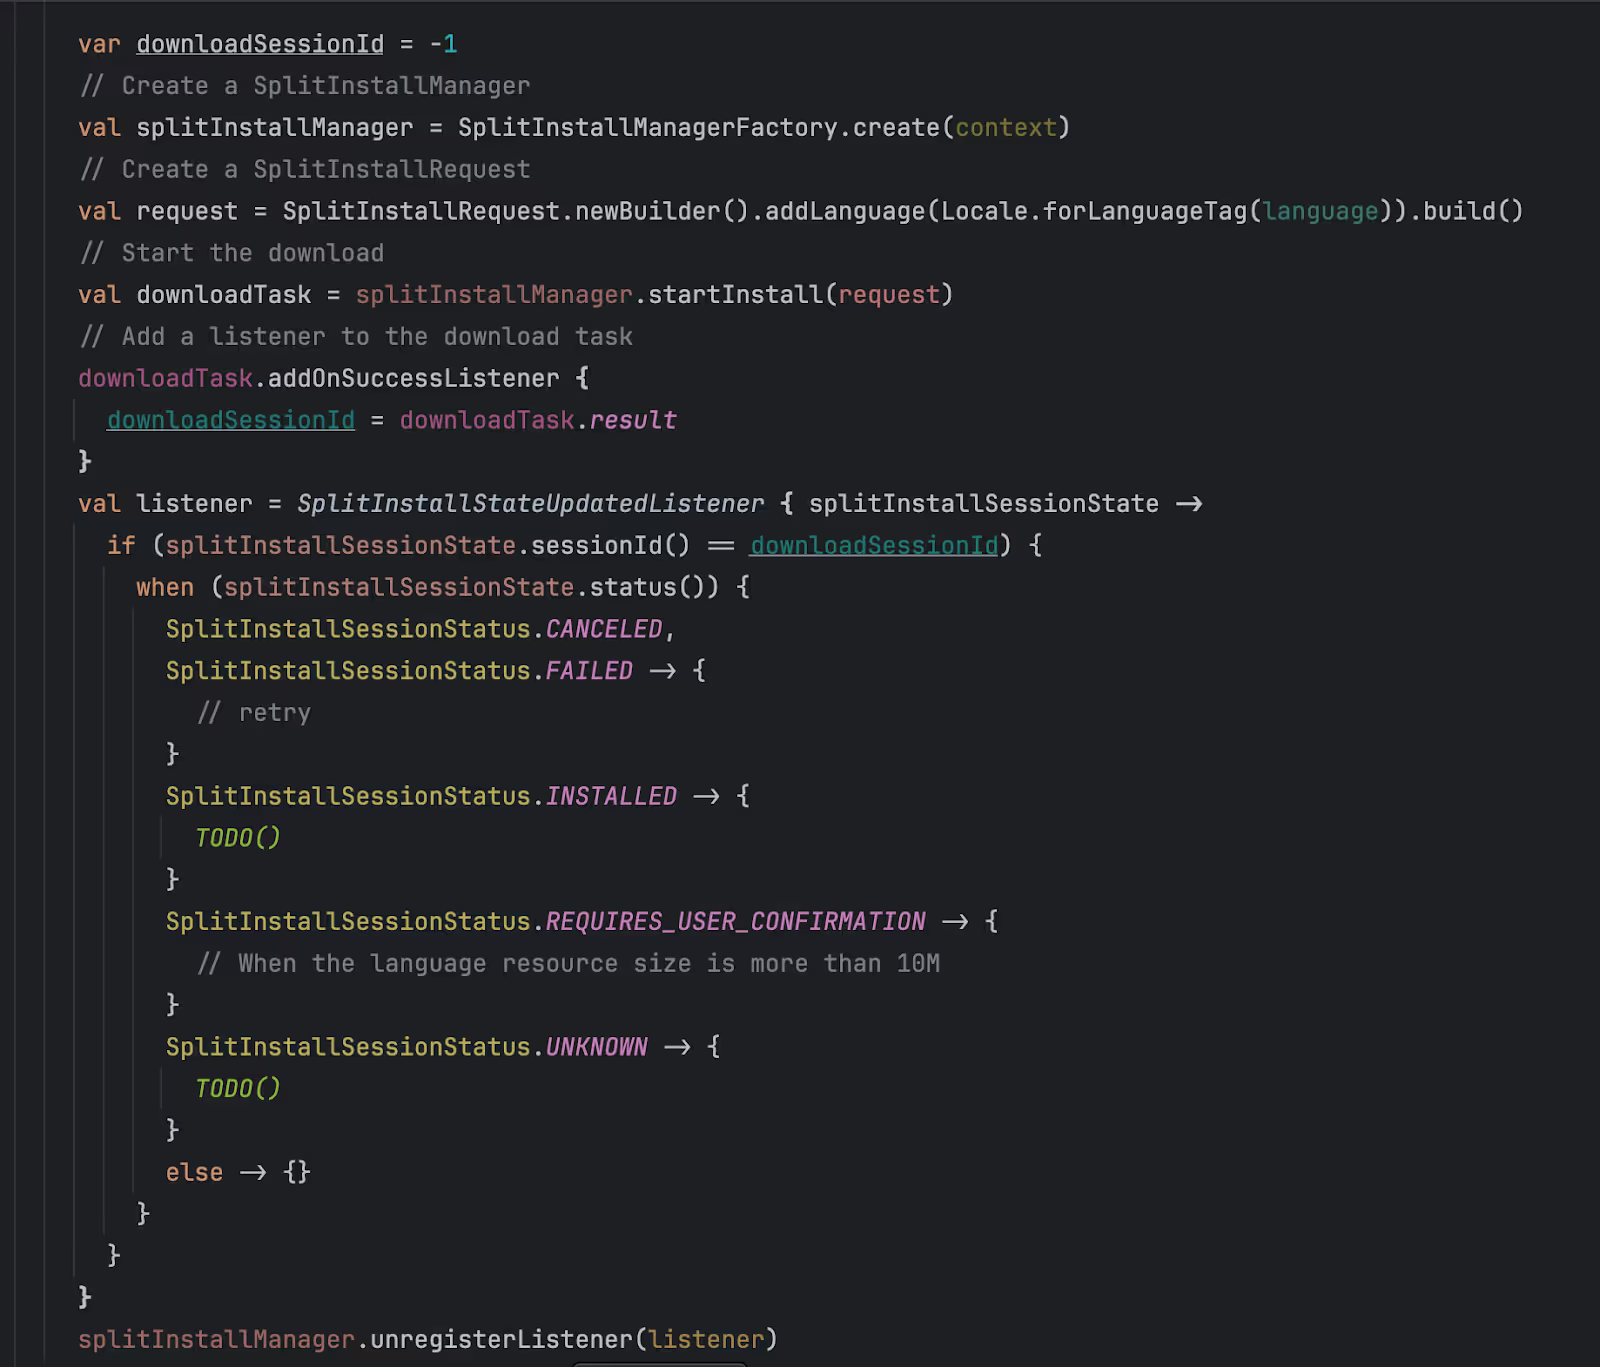
PS: here is the proper dependency to add spilitManager to your app
Sync Locale!
Most of us use the locale class for date formatting, sending the correct language header to the backend, etc. The locale is not the same as the app language. When the app’s language changes or the new language is installed, we need to set the default locale Locale.setDefault so that the formatting and header we send to the backend are correct.
Otherwise, we might have the backend content in language A and app string resources in language B 💣
👿 It’s crucial to remember that the Locale class must be synchronized each time the app starts, as it doesn’t automatically update to reflect the app’s language.
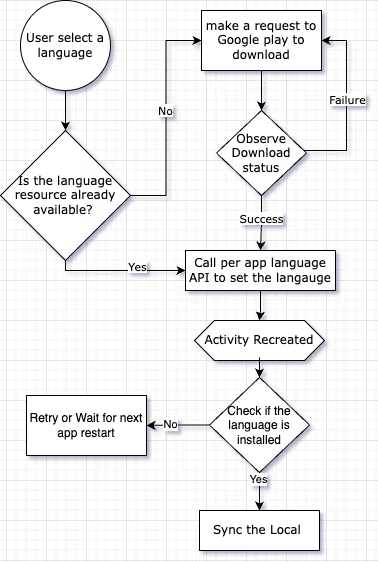
The proper flow for changing apps’ Language
This applies when language resources are not included within the app itself.
- To check if a language is installed in the app, we can use the splitInstallManager.installedLanguages property. This property will not work on the Debug APK but only on the release bundle.
- Calling setApplicationLocales will recreate the activity so we can do the follow-up actions.
- Depending on the device and brand, the new language may not be installed immediately after activity recreation. In such cases, you may need to either retry the process or wait for Google Play to complete the installation.
- To retry, first cancel the previous language installation request using the downloadSessionId with splitInstallManager.cancelInstall(downloadSessionId).
How to test the language change
To test, we should have the app project on Google Play. Then, we must generate a signed app bundle in AS and upload it to the internal app-sharing page in the Google Play Store. You can then share the link with testers or install it on your device. The uploaded app bundles will be deleted in two months, and you can see the errors/info logs in Crashlytics to check if everything is working correctly.
If you are adding all the language resources to the app, there is no need to build a bundle; simply test everything in the debug APK!


.jpg)


